Installing WordPress is the first step toward creating a functional and appealing website. As one of the most popular content management systems (CMS) worldwide, WordPress powers over 40% of all websites on the internet. Its ease of use, flexibility, and robust community support make it a top choice for beginners and experienced developers alike. Some developers make a fantastic living setting up and managing WordPress websites for their clients. Once you have learned how easy it is to do yourself, you’ll wonder why some people pay so much to these developers, but knowledge is power. It’s only easy if you know how!
3. Installing WordPress via One-Click Installers
Most hosting providers offer one-click installation options for WordPress, making the process straightforward and efficient. Here’s how to install WordPress using a one-click installer:

- Log into your Hosting Control Panel: Navigate to the control panel (often referred to as cPanel).
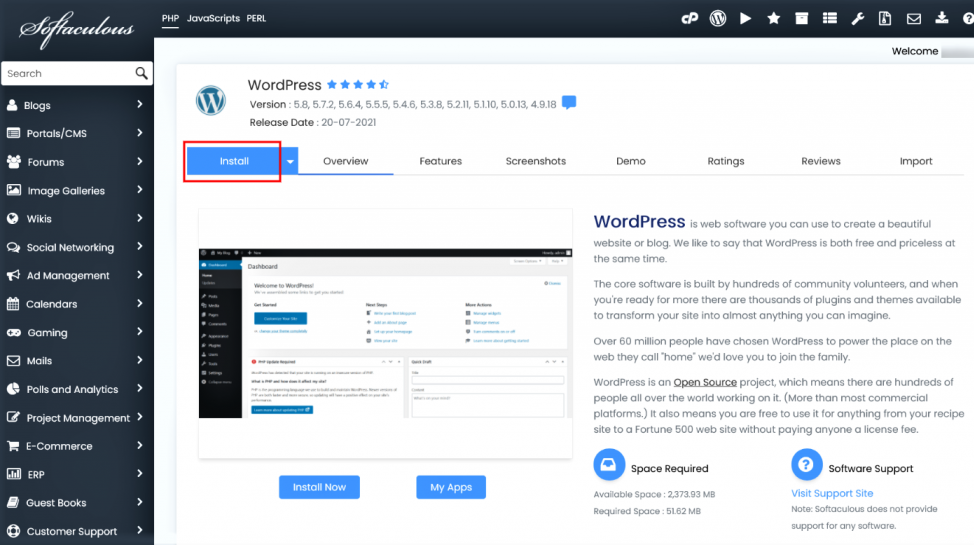
- Locate the WordPress Installer: Look for the WordPress installer in your control panel. This feature may be listed under Website, Software, or Apps. IN my case, it is called “WordPress Manager by Softaclous” (see image below)
- Start the Installation Process: Click on the WordPress installer icon, and follow the prompts. You may need to select your domain name from a dropdown menu, choose a directory (leave it blank to install in the root directory), and fill out some basic information.
- Fill in Site Details: Enter your website’s title, username, password, and email address. Choose a strong password to secure your admin account. Make sure to record this information, as you’ll need it to log in to your WordPress dashboard.
- Complete the Installation: Once you’ve filled out the necessary information, click the install button. The installer will set up WordPress on your server, which typically takes just a few minutes. Once complete, you will receive a confirmation message with your admin login URL. You’ll find a detailed video walk through of setting up a WordPress installation on followged.com
4. Manual Installation of WordPress
If you prefer a more hands-on approach or your hosting provider doesn’t offer one-click installations, you can install WordPress manually. Here’s how:

- Download WordPress: Go to the official WordPress website and download the latest version of WordPress as a .zip file.
- Upload WordPress to Your Server: Using an FTP client (like FileZilla), connect to your web hosting server. Upload the extracted WordPress files to your chosen directory (usually the public_html folder).
- Create a Database and User: In your hosting control panel, find the MySQL databases section. Create a new database and a user, granting that user full privileges to the database. Note down the database name, username, and password for later use.
- Configure wp-config.php: Rename the file wp-config-sample.php to wp-config.php. Open this file in a text editor and fill in your database details (database name, username, password). This file serves as the configuration file for your WordPress installation.
- Run the Installation: In your web browser, navigate to your domain name. You should see the WordPress installation wizard. Follow the prompts to complete the installation, filling out your site title, username, password, and email address when prompted.
- Complete the Installation: After you complete the wizard, WordPress will finalize the installation, and you’ll be directed to the login page. Use your admin credentials to log in to your WordPress dashboard.
5. Post-Installation Setup
Once you have successfully installed WordPress, it’s time to configure your website for optimal performance:
- Choose a Theme: Navigate to the “Appearance” section in your dashboard and select “Themes.” You can choose from free themes available in the WordPress repository or upload a premium theme you’ve purchased.
- Install Essential Plugins: Plugins extend the functionality of your WordPress site. Some essential plugins to consider include security plugins (like Wordfence), SEO plugins (like Yoast SEO), and backup plugins (like UpdraftPlus). To install plugins, go to the “Plugins” section and click “Add New.”
- Configure General Settings: Under “Settings,” review and adjust general settings such as your site title, tagline, timezone, and permalink structure to optimize your site for SEO.
- Create Important Pages: Start by creating essential pages, such as Home, About, Contact, and Blog. You can add these pages under the “Pages” section in your dashboard.
Installing WordPress is a straightforward process that lays the groundwork for your website. I would highly recommend going for the 1-click installer especially if you are relatively new to this. But once WordPress has been installed, you can start customizing your site, creating content, and building an online presence that resonates with your audience. This foundation is essential for growing your website, driving traffic, and achieving your online goals.